
Sample-hello-world » History » Revision 15
« Previous |
Revision 15/19
(diff)
| Next »
Henning Blohm, 28.02.2021 20:00
Hello World Web App Sample
This sample application shows how to set up the most basic Java Web application in z2.
Z2 integrates with the Jetty Web container and Web applications on Z2 are really just standard Java EE Web applications. What is unfamiliar for the typical Maven, Gradle, or Ant user is how applications are developed and modularized on Z2. So this sample case is hence more about Web applications as developed on Z2 than it is about Web application development.
Please skip to Step by Step - Or Setting Things Up Yourself unless you just want to see it running.
This sample is stored in the repository z2-samples.hello-world-web.
Prerequisites
Z2 has the following Java Version requirements
| Z2 Version | Min. Java version required | Max Java version supported | Max language level |
|---|---|---|---|
| 2.1 - 2.3.1 | Java 6 | Java 7 | Java 7 |
| 2.4 - 2.5 | Java 8 | Java 8 | Java 8 |
| 2.6 | Java 9 | Java 11 | Java 10 |
| 2.7 | Java 9 | Java 11 | Java 11 |
| 2.8 | Java 9 | Java 13 | Java 13 |
| 2.9b | Java 8 | Java 8 | Java 8 |
| 2.9.1 | Java 11 | Java 16 | Java 15 |
| 2.9.1b | Java 8 | Java 8 | Java 8 |
| 2.10 | Java 11 | Java 18 | Java 18 |
| 2.10.1 | Java 11 | Java 21 | Java 18 |
| 2.10.2 | Java 11 | Java 21 | Java 18 |
| 3.0 | Java 17 | Java 23 | Java 23 |
| master | Java 17 | ? | Java 23 |
Note: Most samples suggest to use the master branch. You may choose another version branch (please check the respective repository).
Make sure you have a corresponding Java Development Kit (JDK) or Java Runtime Environment (JRE) installed. If in doubt, go to Download Java SE.
Note: Running v2.1-v2.3.1 on Java 8 is supported by specifying
com.zfabrik.java.level=7
(or 6, if that is your desired compilation language level) in <home>/run/bin/runtime.properties. By this the Java compiler version detection does not fall back to a lower level.
Setting up the sample
Follow these instructions, if you just want to see it running. Otherwise we recommend skipping this section and rather follow the step by step instructions below.
Here's the really fast version:
mkdir install
cd install
On Mac-OS or Linux run:
wget http://download.z2-environment.net/z2/z2-base-v3.0.zip
unzip z2-base-v3.0.zip
On Windows download the archive and unpack using the Windows explorer. Make sure to unpack into the installation folder previously created.
This will create a folder z2-base.core that contains the complete version 3.0 z2-base installation.
git clone -b v2.8 https://www.z2-environment.net/git/z2-samples.hello-world-web
On Mac OS or Linux run:
cd z2-base.core/bin
./gui.sh
On Windows run:
cd z2-base.core\bin
gui.bat
(In order to check that z2 is up, when you see "Completed home process initialization", try http://localhost:8080/adm with user "z*" and password "z".)
The first time you launch the sample, it will take a while to download all required resources.
Step by Step - Or Setting Things Up Yourself
In this section we will manually create the basic structure of a Z2 module and see how it is discovered by Z2 during development.
We assume that you have prepared some development workspace install and that you installed z2-base.core, the core runtime of z2 in that folder. If you have not done so yet, run
mkdir install
cd install
On Mac-OS or Linux run:
wget http://download.z2-environment.net/z2/z2-base-v3.0.zip
unzip z2-base-v3.0.zip
On Windows download the archive and unpack using the Windows explorer. Make sure to unpack into the installation folder previously created.
This will create a folder z2-base.core that contains the complete version 3.0 z2-base installation.
Create a Module
Change into install and create a folder com.zfabrik.samples.hello-world and in that folder create the following structure
├── java
│   ├── src.api
│   ├── src.impl
│   └── z.properties
└── web
    ├── WebContent
    │   └── WEB-INF
    │       └── web.xml
    └── z.properties
where java/z.properties:
com.zfabrik.component.type=com.zfabrik.java

java.privateReferences=\
    com.zfabrik.servletjsp
and web/z.properties:
com.zfabrik.component.type=com.zfabrik.ee.webapp

webapp.path=/hello-world
webapp.requiredPaths=

webapp.server=environment/webServer
com.zfabrik.systemStates.participation=environment/webWorkerUp
and web/WEB-INF/web.xml:
<?xml version="1.0" encoding="UTF-8"?>

<web-app id="z2WebApp" version="3.0"
    xmlns="http://java.sun.com/xml/ns/javaee"
    xmlns:xsi="http://www.w3.org/2001/XMLSchema-instance"
    xsi:schemaLocation="http://java.sun.com/xml/ns/javaee http://java.sun.com/xml/ns/javaee/web-app_3_0.xsd">
</web-app>
Note: If you are using the Eclipse IDE and have installed the eclipsoid plugin (How_to_install_Eclipsoid) you can use the wizard at "File > New > Other > New Java/Web z2-Project". Note however that it may be necessary to adapt the generated files to match the ones above (in particular check for web.xml to refere to servlet api 3.0 at least).
This is the most essential module structure for a Web Application. You will find all Web Application resources directly under the web folder. Java resources however would be put into the java component folder, in src.impl if they are not to be re-used by (or "be visible to") other modules, in src.api, if they are not to be re-used by (and hence "not visible to") other modules.
Let Z2 Find It
So now we have a module structure in a folder next to our z2 installation. Unfortunately so far this has no meaning for z2. That is because it is not visible through any registered component repository. Fortunately however there is the Development Component Repository that allows us to dynamically publish modules on the local file system for discovery by Z2. It is configured to look for modules next to z2-base.core that are armed.
In order to arm the new module, i.e. in order to make it visible to Z2, simple put an (empty) file LOCAL into the root of the module hierarchy. I.e. com.zfabrik.samples.hello-world/LOCAL. The module structure should now look like this:
├── java
│   ├── src.api
│   ├── src.impl
│   └── z.properties
├── LOCAL
└── web
    ├── WebContent
    │   └── WEB-INF
    │       └── web.xml
    └── z.properties
To tell Z2 that there is some change, we need to "synchronize". But first, we need to start Z2.
On Mac OS or Linux run:
cd z2-base.core/bin
./gui.sh
On Windows run:
cd z2-base.core\bin
gui.bat
(In order to check that z2 is up, when you see "Completed home process initialization", try http://localhost:8080/adm with user "z*" and password "z".)
In order to synchronize (starting includes synchronization - but note for next time): Press the  button on the Z2 GUI or, from eclipsoid in Eclipse or IntelliJ press the Sync button in the IDE.
In the Z2 logs you should see
...pp.WebAppResource [800]: Starting WebApp: com.zfabrik.samples.hello-world/web
...pp.WebAppResource [800]: Done starting Web App (/hello-world): com.zfabrik.samples.hello-world/web
and when accessing http://localhost:8080/hello-world you should see some default Jetty provided directory listing.
Congratulations: You have your first Web app running.
Add Some Logic
Before closing, let's add some real "hello world" logic.
The simplest thing to do is to add an index.jsp Java Server page: So let's add com.zfabrik.samples.hello-world/web/WebContent/index.jsp:
<html>
<body>
<h1>Hello World!</h1>
</body>
</html>
After adding the file, synchronize Z2 by either pressing the button on the Z2 GUI or by using the Eclipsoid function in Eclipse or IntelliJ.
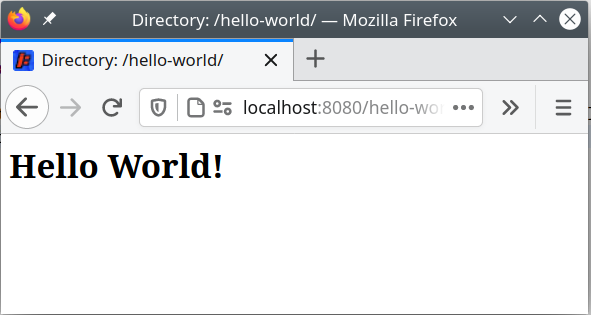
Visiting http://localhost:8080/hello-world you will now see:
Now. So far, this is neither running any Java code of ours nor does it even use any JSP logic.
So, as our last enhancement, let's write a Servlet that prints "Servlet World" and include its output into index.jsp. Admittedly, that is not very useful, but so what.
As the Servlet is not supposed to be used by other modules, we will put it in src.impl. More specifically add com.zfabrik.samples.hello-world/java/src.impl/samples.hello.world.impl/WorldServlet.java:
package sample.hello.world.impl;

import java.io.IOException;

import javax.servlet.ServletException;
import javax.servlet.annotation.WebServlet;
import javax.servlet.http.HttpServlet;
import javax.servlet.http.HttpServletRequest;
import javax.servlet.http.HttpServletResponse;

@SuppressWarnings("serial")
@WebServlet(urlPatterns = {"/WEB-INF/world"})
public class WorldServlet extends HttpServlet {
    @Override
    protected void doGet(HttpServletRequest req, HttpServletResponse resp) throws ServletException, IOException {
        resp.getWriter().write("Servlet World");
    }
}
and change com.zfabrik.samples.hello-world/web/WebContent/index.jsp:
<html>
<body>
<h1>Hello <jsp:include page="/WEB-INF/world"/>!</h1>
</body>
</html>
The module structure looks like this now:
├── java
│   ├── src.api
│   ├── src.impl
│   │   └── sample
│   │       └── hello
│   │           └── world
│   │               └── impl
│   │                   └── WorldServlet.java
│   └── z.properties
├── LOCAL
└── web
    ├── WebContent
    │   ├── index.jsp
    │   └── WEB-INF
    │       └── web.xml
    └── z.properties
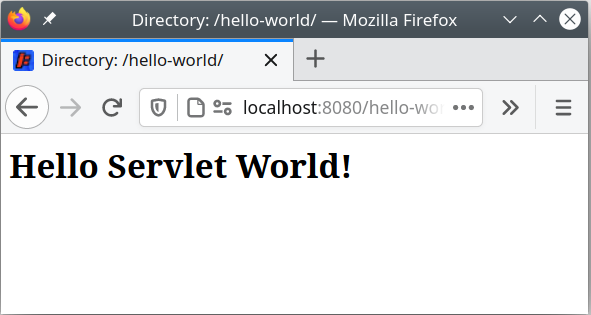
Synchronizing and visiting http://localhost:8080/hello-world you will now see:
Final Note
We will stop here. Please have a look at other samples and the reference documentation of the current version:
The latest released version is 3.0 (Javadoc, V3-0 Reference, Download)
Updated by Henning Blohm over 5 years ago · 15 revisions