
Step 3 - First steps with Z2 on Git » History » Revision 16
« Previous |
Revision 16/69
(diff)
| Next »
Udo Offermann, 11.09.2012 15:24
First steps with z2 v2.1
Prerequisites
You need a cloned z2-base.core repository as described on the previous page.
Furthermore you need the Eclipse-IDE (one of Galileo, Helios, Indigo or Juno is fine) and the Egit plug-in:.
First steps with the z2-environment
As the next step you will learn how to do the first development steps using Eclipse. Please stop the server before you continue because we will now show you how to start it from inside the Eclipse IDE.
We recommend to keep the repositories and workspace close together. So please go back to the "z2-base" directory (cd ../../.., if you are still inside the "run/bin" directory) and create a folder called "workspace" - this will be used as the workspace root for Eclipse:
:bin$ cd ../../..
:z2-base$ mkdir workspace
:z2-base$ ls -l
total 0
0 drwxr-xr-x   2 mr_x  staff   68  7 Sep 16:34 workspace
0 drwxr-xr-x  12 mr_x  staff  408  7 Sep 15:11 z2-base.core
:z2-base$
Now start Eclipse and choose .../z2-base/workspace as your workspace folder.
We have to add the core repository to the EGit repositories view. Detailed documentation of how-to work with EGit can be found on the EGit Wiki pages.
On the Git perspective choose "Add an existing local Git repository". In the "Directory" field type in the path to the ".../z2-base" directory.
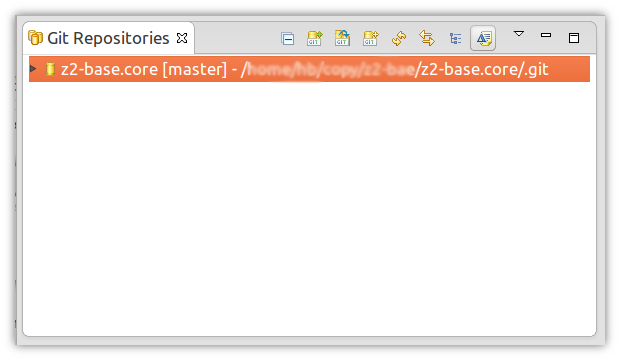
After hitting "search" the search results should list the z2-base.core repository, click "finish" and the repositories view should look like this:
Now import the core project from the repository. Right-click the repository, choose "Import projects..." from the context menu and click "next" and then "finish".
On the Java perspective the "core" project should be now available in the package explorer:

The core project contains two launch entries, one for Linux/Mac OS and one for Windows. Right click the one that fits to your OS and choose "Run As >" and "z2_base".
This starts the z2-environment again and opens the z2-gui inside a new window labled "Z2 Home (z2-base v2.1)":

From now on you will find the z2-base launch entries in Eclipse "External Tools" (either inside "Run", "External Tools >" or click the "External Tools" button in the toolbar).
The z2-environment provides an Eclipse plug-in called "Eclipsoid" that enables convenient development of z2 applications.
Developing modular software requires that the IDE can resolve the dependencies between single projects.
Either you import all projects into your workspace or you live with the red x-markers indicating that Eclipse cannot compile the Java sources properly.
The third option is that someone else resolves the dependencies for you - this is what the Eclipsoid does. This way you can checkout and focus on a project subsets while
the Eclipsoid plug-in provides the transitive closure of all required prjects and libraries.
There are other features provided by the Eclipsoid plug-in that are explained in more details on the Eclipsoid wiki pages.
Installation of the Eclipsoid plug-in
The z2-environment that you just started contains the update-site for the Eclipsoid plug-in. Open the software update/installation wizard (in Indigo it's located at "Help/Install New Software...")
and use http://localhost:8080/eclipsoid/update as update-site URL (the field labled "Work with"):
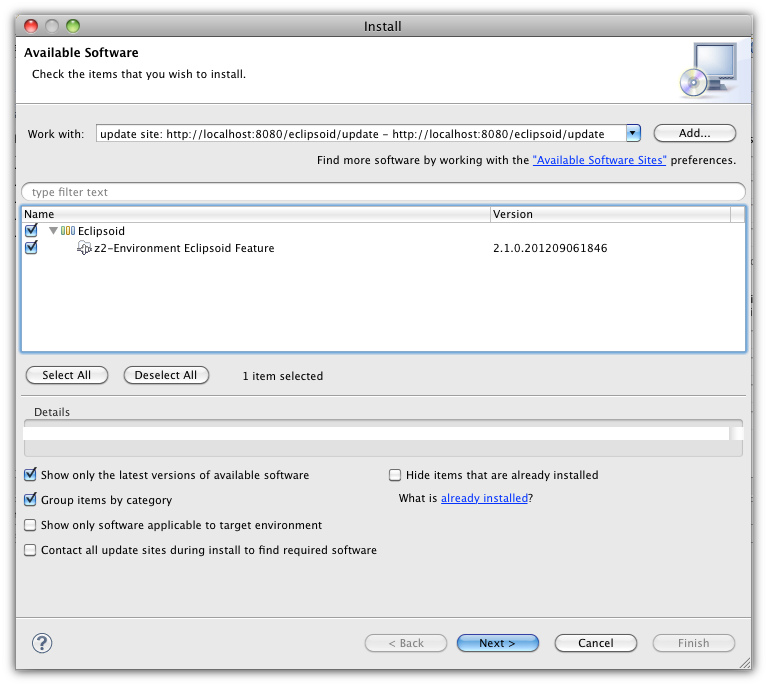
Please note that the Eclipsoid version will be different because the screenshots are made with an intermediate version of the plug-in.
Complete the installation wizard (you can speed up the installation procedure by deselecting "Contact all update sites during install...") and restart Eclipse.
Now you should see a new menu entry labled "z2-Environment" and two new icons:
Changing source code and check the result
To change source code, we need an open project in Eclipse. We're going to change the hello-world web application which remains in the samples repository.
This requires to a) make the Git repository available in EGit, b) import the project into Eclipse and c) change the project and check the result.
The Eclipsoid plug-in simplifies these steps. Since the z2-environment knows the repository landscape, we can ask it to share this knowledge with us. In the new "z2-environment" menu choose the entry labled "z2-Repositories view".
This will open a view like this:
This view lists all repositories known by this system. The Eclipsoid plug-in connects by default to the Eclpsoid web application on http://localhost:8080 which provides a lot of online information about the server. The connection can be customized on the "z2-environment" preference page.
You can see that there are two repositories listed; one called com.zfabrik.boot.config/systemRepository containing the z2 foundation services and one called environment/samplesRepository containing some sample applications including the hellow world web applciation.
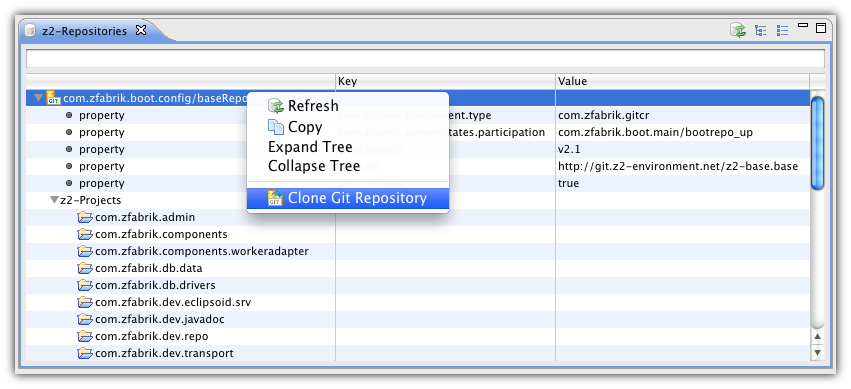
Now right-click on the samples repository and choose "Clone Git repository" from the context menu. This will create a clone from http://git.z2-environment.net/z2-base.samples next to the core repository inside your z2-base directory. You can check this out by double clicking on the samples repository - please note that the entry now looks like a hypelink with blue text color. Switch back to the java perspective and unfold the "environment/sampleRepository" node and further its "z2-projects" child. Now you will see all projects which are stored inside this repository. Right-click the "com.zfabrik.samples.helloworld" project and choose "Import Project" from the context menu. This does the same as the import project action of the Git repositories perspective, but you don't have to switch the perspectives.
Once the project is imported go to the Java Package Explorer view and drill down to +com.zfabrik.samples.helloworld / java/src.impl / com.zfabrik.samples.helloworld / HelloWorldServlet.java, open the the class via double click. The result should look like this:
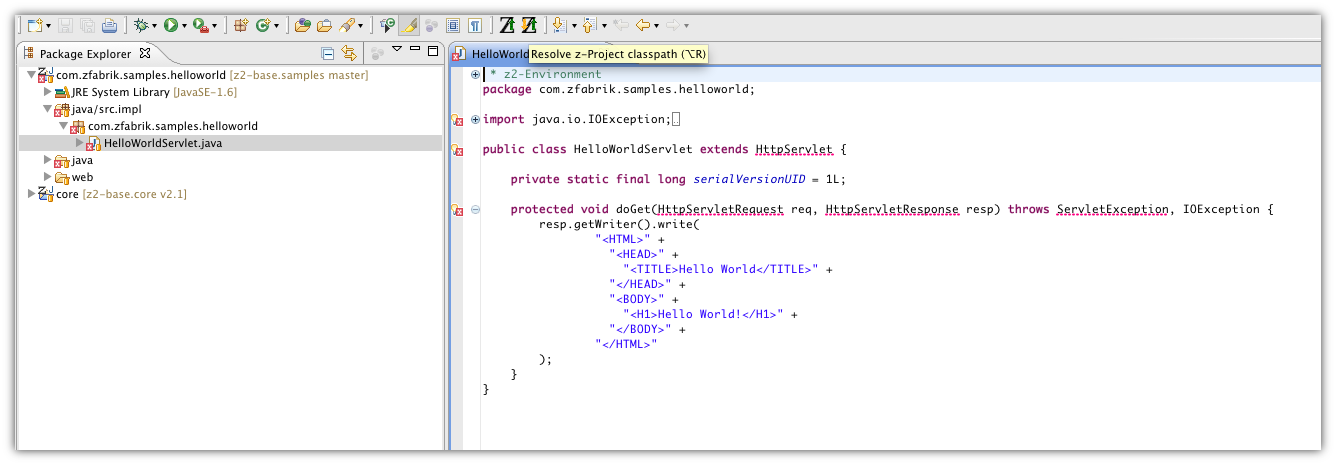
You'll see the source code and a lot of red x-markers telling you that Eclipse cannot resolve certain identifiers. If you want you can check the classpath of the Hello World project and indeed there are only three entries: one for the JRE, one for the sources and one called "Eclipsoid: z2-Environment Build Container". This container will resolve the incomplete classpath when it is asked to do so. You can either select the entry "Resolve z2-Project classpaths", click the new icon ![]() or simply hit <Alt+R>. Now all red x-markers should be gone.
or simply hit <Alt+R>. Now all red x-markers should be gone.
Now we want to change the code; you can change whatever you like, e.g. replace "Hello World!" by "Hello Earth!" and save it. To make this change available, we have to tell the server two things: 1. That it should check for changed sources and 2. that it should - beside all conencted Git repositories - consider our local version as well. From z2 point of view the Eclipse worksapce is a repository as well - it's called the dev-repository because it contains the newest developed stuff. When we ask the z2 server to check for new changes (that's called to synchronize the server), it will find two versions of the hello world project: one inside environment/samplesRepository and one inside the dev-repository which is your Eclipse workspace. So which one should it take? To solve this "conflict" the dev-repository has a switch for each project which can be "armed" and "disarmed". If it's "disarmed" - which is the default - the version in the Git repository will win. If it's "armed" our version in the workspace will win. So we need to "arm" the Hello World project: Right-click the project "com.zfabrik.samples.helloworld" in the Java Package Explorer and choose "Arm z2-Projects":

You will notice that there will be now a green "z" decoration at the upper left edge of the Java icon in the package explorer:  .
.
Updated by Udo Offermann almost 14 years ago · 16 revisions