
Sample-hbase-mail-digester » History » Revision 10
« Previous |
Revision 10/24
(diff)
| Next »
Henning Blohm, 02.08.2014 15:09
Sample that combines HBase with full-stack Spring and Hibernate usage
This sample consists of an application that loads large Mbox archive files and extracts email addresses using a map reduce job. Extracted email addresses are then written to a relational database and offered for editing.
Being a full stack sample it shows how to design a multi-module application with a service tier that can be seamlessly used from a Web app as well as from an application-level map-reduce job.
Note: This sample still uses v2.2 of z2 - so making sure the correct versions are specified below is crucial.
Note: Due to HBase, you will need to run this on Linux or Mac OS.
Proceed to how this works
Install
Here is the quick guide to getting things up and running. This follows closely How_to_run_a_sample and Install_prepacked_CDH4.
Checkout
Create some installation folder and check out the z2 core and the HBase distribution, as well as the sample application.
git clone -b v2.2 http://git.z2-environment.net/z2-base.core
git clone -b v2.2 http://git.z2-environment.net/z2-samples.cdh4-base
git clone -b master http://git.z2-environment.net/z2-samples.hbase-mail-digester
(Note: Do not use your shared git folder, if you have any, as the neighborhood of these projects may be inspected by z2 later on).
Prepare
We need to apply some minimal configuration for HBase. At first, please follow Install_prepacked_CDH4 on how to configure your HBase checkout. There are a few steps that need to be taken once only but still have to.
Assuming HBase has started and all processes show as described, there is one last thing to get running before starting the actual application:
Running a Java DB Network Server
Previously to Java 9, the Java SE Development Kit (JDK) by Oracle provided the Java DB - essentially the same as the Apache Derby DB. That is not the case anymore. However, we use that Database implementation in our samples. In order to run those samples that illustrate use of a relational database, please follow the instructions below to install and run Apache Derby. Could hardly be simpler.
Step 1: Download and Install
Unless you have done so already, download Apache Derby DB and follow the installation how-to.
Note: You do not need to unpack Apache Derby into some global folder on your system. Instead you may want to use some local folder under your user's home folder. There is no problem installing and runnning different instances and configurations at any time.
Step 2: Run
Let's assume you installed (well - unpacked) into a folder $DERBY_INSTALL. Also, let's assume some Java Runtime Environment is installed and ready.
Simply run the following on Linux or Mac OS:
cd $DERBY_INSTALL
java -jar lib/derbyrun.jar server start
On Windows run
cd %DERBY_INSTALL
java -jar lib\derbyrun.jar server start
That's it. Apache Derby will be waiting for connections on port 1527.
Start
Now that all databases are up we can start the application simply by running (as always):
# on Linux / Mac OS:
cd z2-base.core/run/bin
./gui.sh

# on Windows:
cd z2-base.core\run\bin
gui.bat
At first startup this will download some significant amount of dependencies (Spring, Vaadin, etc.). So go and get yourself some coffee....
When started, go to http://localhost:8080/digester-admin. You should see this:
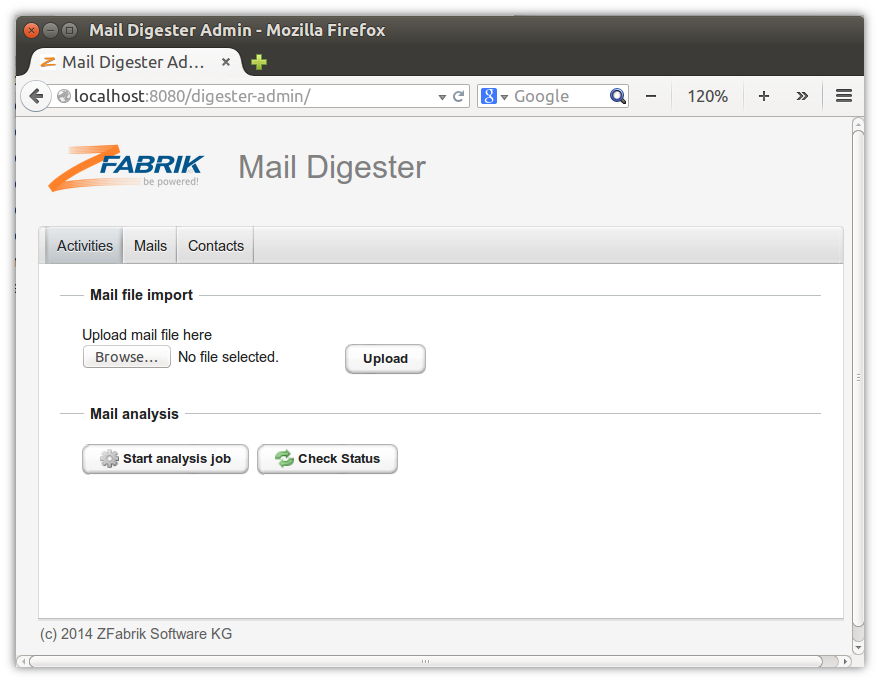
Using the application
To feed data into the application, please download some mail archive in mbox format, e.g. from http://tomcat.apache.org/mail/. Upload the file to the digester application as outline on the first tab. Mails from mail archives are imported into the HBase database.
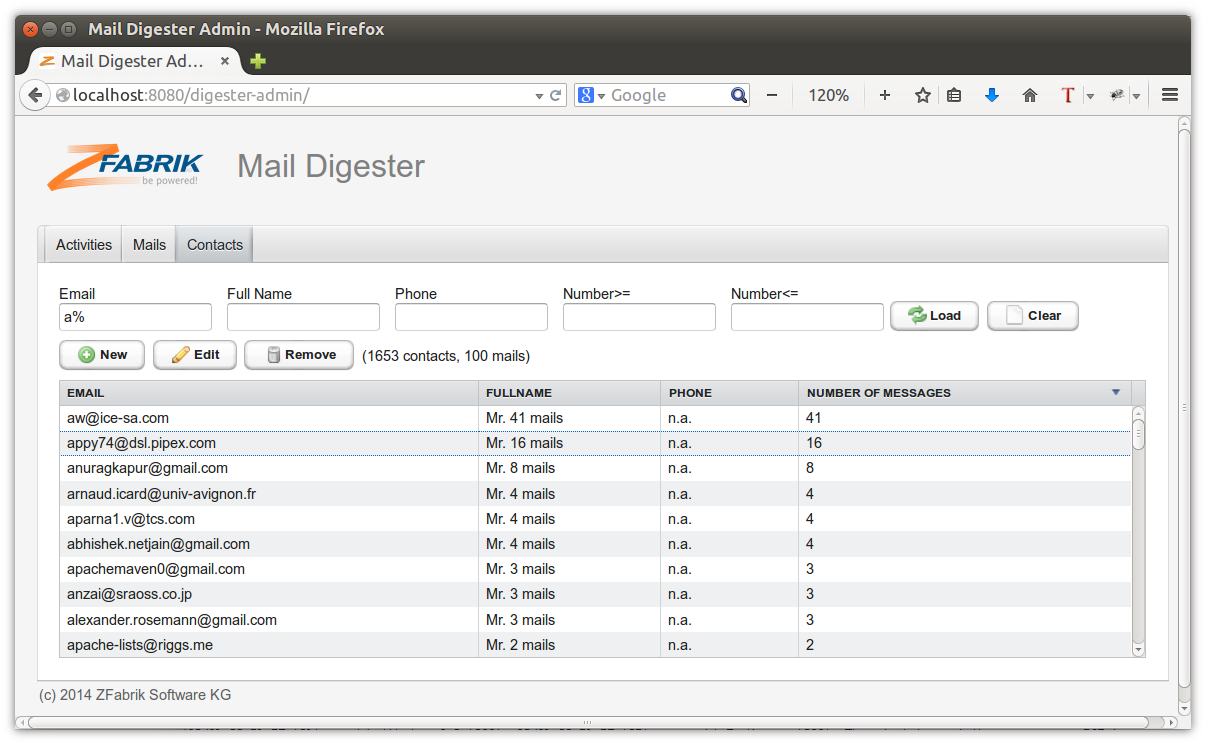
When imported, run the analysis map-reduce job by clicking on "Start analysis job". The purpose of this job is to identify mail senders and provide some data like email address, full name, and number of mails into the relational database powered by Derby.
When the database is empty, progress reporting is rather coarse-grained. After a while you should see:
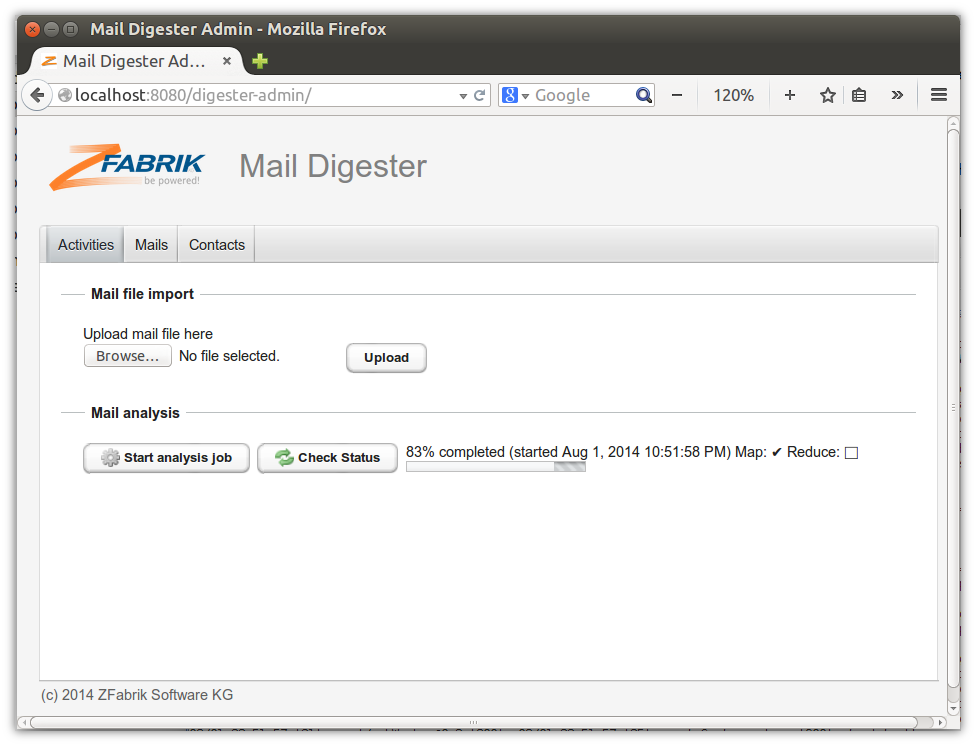
And work should be completed shortly after. When done, check the extraced sender data:
How this works
...
Updated by Henning Blohm almost 12 years ago · 10 revisions